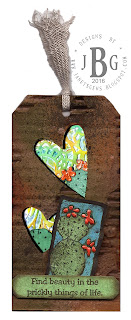
The Texas Prickly Pear is seen every where it seems. And when they are in bloom the landscape is transformed. Texana Designs has several cactus stamps and really great sentiments. This month the team was challenged to use the prickly pear stamp and a choice of three sentiments. Enjoy the following.
 |
| 12" x 12" Page Layout by Karen Lambert |
Karen Lambert's Supply List:
TD stamps: Cactus Heart, Cactus Bloom, Prickly Pear and Find Beauty in the prickly things in life.
Craft Card Stock
Bazzil Basics faded yellow polka dot pattern paper
Manila Shipping Tag
Versa Mark to stamp Cactus Heart on Craft Card stock and then lightly go over it with Tea Dye Distress Ink on a blending tool
Distress edges of all paper and tag with Tea Dye and Spiced Marmalade Distress Ink
Stamp Cactus Bloom on cardstock and color with Promarkers.
Stamp Prickly Pear and Sentiment on Tag and color with Promarkers
Ribbon and Jute for Tag Decor.
 |
| A2 Card by Jilda Bolton |
Jilda Bolton's Supply List:
Texana Design Stamps: Prickly Pear, Feeling a Little Rough
Paper: Green, yellow & white
Green ink pad, sponge
Copic Markers: Green YG91,93,95 Yellow Y08
Spellbinders Celebrations 3D Embossing folder – Fabric Weave
X-Press It ¼” high tack double sided tape
I
stamped the Prickly Pear three times, sponged a green background,
colored the cactus with Copic Markers, and cut out the images.
To
create the back ground, I used a Spellbinders 3D Fabric Weave embossing
folder on yellow paper. The Spellbinders Celebration Embossing folders
were created to use in the Spellbinders Grand Calibur Die Cutting &
Embossing Machine. Since I don’t have that machine, I found directions
online for using the Sizzix Big Shot instead:
1) Sandwich the Sizzix multipurpose platform with both Tab 1 and Tab 2 closed and one cutting plate
2) Since the Celebration 3D embossing folders both emboss and deboss, you need to lightly spritz the paper on one side with water to soften the fibers of the paper so that it doesn’t tear
3) Place the 3D folder with the damp paper inside on top of the multipurpose platform and put one cutting plate on top
4) Roll through the machine and remove the paper
5) Because the paper will be damp you need to let it dry (doesn’t take very long but you can lightly heat it if you are in a hurry)
I
used X-Press It tape to put the paper pieces together since the surface
is bumpy and I wanted to make sure they would stay stuck together.
 |
| A2 Card by Megan Bickers |
Megan Bicker's Supply List:
Texana Designs Stamps: Prickly Pear Cactus, Cactus Border, Find Beauty in
the Prickly Things of Life
Georgia Pacific: White Cardstock
Bazzill: Navy Cardstock
Tsukineko: Memento Inkpad (Tuxedo Black)
Ranger: Tim Holtz Distress Crayons #2 (Festive Berries, Rusty Hinge,
Fossilized Amber, Peeled Paint, Chipped Sapphire),
Distress Inkpad (Fossilized Amber),
Foam Blending Tool
Pentel: Aquash Water Brush
Heat Tool
3M Foam Tape
I colored directly onto the edges of the stamped images with the Distress
crayons and used my water brush to fade and blend the color over the entire
image. I used the Fossilized Amber inkpad and my foam blending tool to add
some yellow ink to the edge of my card base, then mounted it on navy
cardstock. The focal image was colored in the same way, and I added the
Prickly Pear cactus over the cactus border with foam tape.
 |
| A2 Card, #8Tag and ATC card |
Janet Bradshaw's Supply List:
Texana Designs Stamps: Prickly
Pear
“Feeling a
little rough around the edges…”
“You’re looking sharp today.”
Color Blocking technique
Paper House ColorWays – noir – 12” x 12”
BoBunny Double Dot Paper
Versamark
White Embossing Powder
Ranger Mica Spray - Tarnished Brass
Brads and
Grosgrain ribbon and crinkle ribbon colored with Distress
Stain
Check out the prickly pear tag on Janet's blog and posted on the Tim Holtz' 12 tags of 2016, March


No comments:
Post a Comment